Manisan Pepaya

Makanan ini banyak sekali digemari oleh ibu ibu yang ingin mempersiapkan jajanan untuk hari raya lebaran atau idulfitri. biasanya jajanan ini dijual di daerah wisata wisata.


Bagi para pembaca yang ingin menghidangkan Manisan Pepaya sebagai cemilan disaat bersantai juga bisa. tidak harus bingung mencari nya karena kita bisa membuatnya sendiri. OK, langsung saja chief luna akan berbagi resep cara membuat Manisan Pepaya. Silahkan pembaca persiapkan bahan – bahanya dan ikuti langkah – langkahnya.

BAHAN:


1 bh pepaya mengkal, kupas

2 sdm garam

750 gr gula pasir

250 ml air


AIR KAPUR SIRIH larutkan dan endapkan:


2 lt air

1 sdm kapur sirih


CARA MEMBUAT:

  • Potong melintas pepaya, kupas dan berihkan dari isinya. Iris sesuai selera.
  • Masukkan garam dan remas-remas lembut pepaya hingga layu, cuci, tiriskan.
  • Siapkan larutan air kapur sirih, buang endapannya, gunakan untuk merendam pepaya 2-3 jam. Cuci. Tiriskan.
  • Taburkan 250 gr gula pasir ke pepaya, aduk rata hingga keluar airnya. Biarkan 1 jam agar gula meresap.
  • Rebus sisa gula dengan 250 air hingga mendidih. Matikan api. Masukkan pepaya. Rendam semalam.
  • Tiriskan pepaya, rebus air gulanya hingga agak kental. Matikan api. Rendam kembali pepaya semalam.
  • Tiriskan. Lakukan proses sekali lagi.

·  Siapkan tampah atau loyang datar yang bersih, jemur manisan pepaya di panas matahari sekitar 2 hari. Sajikan


Follow us: @katalogkuliner

Flourless Chocolate & Almond Cake

Behold this cake! It’s dark, rich, smooth and oh-so-indulgent (like all menshould be). I chanced on the recipe at Times Online and thought it sounded promising, but I really sat up when I noticed the same writer had featured it twice – first here in 2004 (Flourless chocolate & almond cake), and 3 years later in 2007 (Still the best chocolate and almond cake).

“… there is one well-known and well-loved cake that I go to for all manner of celebrations: a rich, flourless chocolate cake adapted from an Elizabeth David recipe in French Provincial Cooking. She simply calls it a chocolate and almond cake, although I believe it is also known as Reine de Saba, or Queen of Sheba. Rich and intense, it rises slightly in the oven only to deflate, crack and wrinkle into a rustic mess as it cools — all part of its charm. It makes a fabulous dinner-party pudding with crème fraiche or custard, is even better as a celebration cake dusted with icing sugar or cocoa powder, and is particularly good, I must say, for breakfast. Of the 260 recipes in the past twelve months, this is one of my favourites.”

– Jill Dupleix, Times Online

WOW.

How could I not give such a highly-recommended cake a shot? So, bright and early I started … mixing and whisking, and before long, I was rewarded with a cake that tasted as good as it looked.

(Left) Yolks bathed in gorgeous morning light. (Right) How come no “rustic cracks”??? I waited and waited for the cake to deflate and crack with panache, but nothing happened! It only cracked slightly when I started slicing – and that was because it was not yet completely cooled. Where are the cracks when you want them? 

Recipe

(from Times Online)

Serves 6

Prep: 20 min

Cook: 50 min

* I would highly recommend using a springform cake pan or removable-bottom cake pan to bake this.

– 200g dark, bitter chocolate (I used Valrhona Equatorial 55%, so … not exactly dark or bitter)

– 1 tbsp strong espresso coffee (I omitted this)

– 1 tbsp rum or brandy (I used rum)

– 150g caster sugar (I reduced the sugar to 130g because I didn’t use dark bitter chocolate)

– 150g butter (I used unsalted)

– 100g ground almonds

– 5 eggs, separated

– Icing sugar for dusting

– Pinch of salt (the recipe doesn’t call for this, but I always feel salt enhances the flavour of chocolate … still, it’s optional)

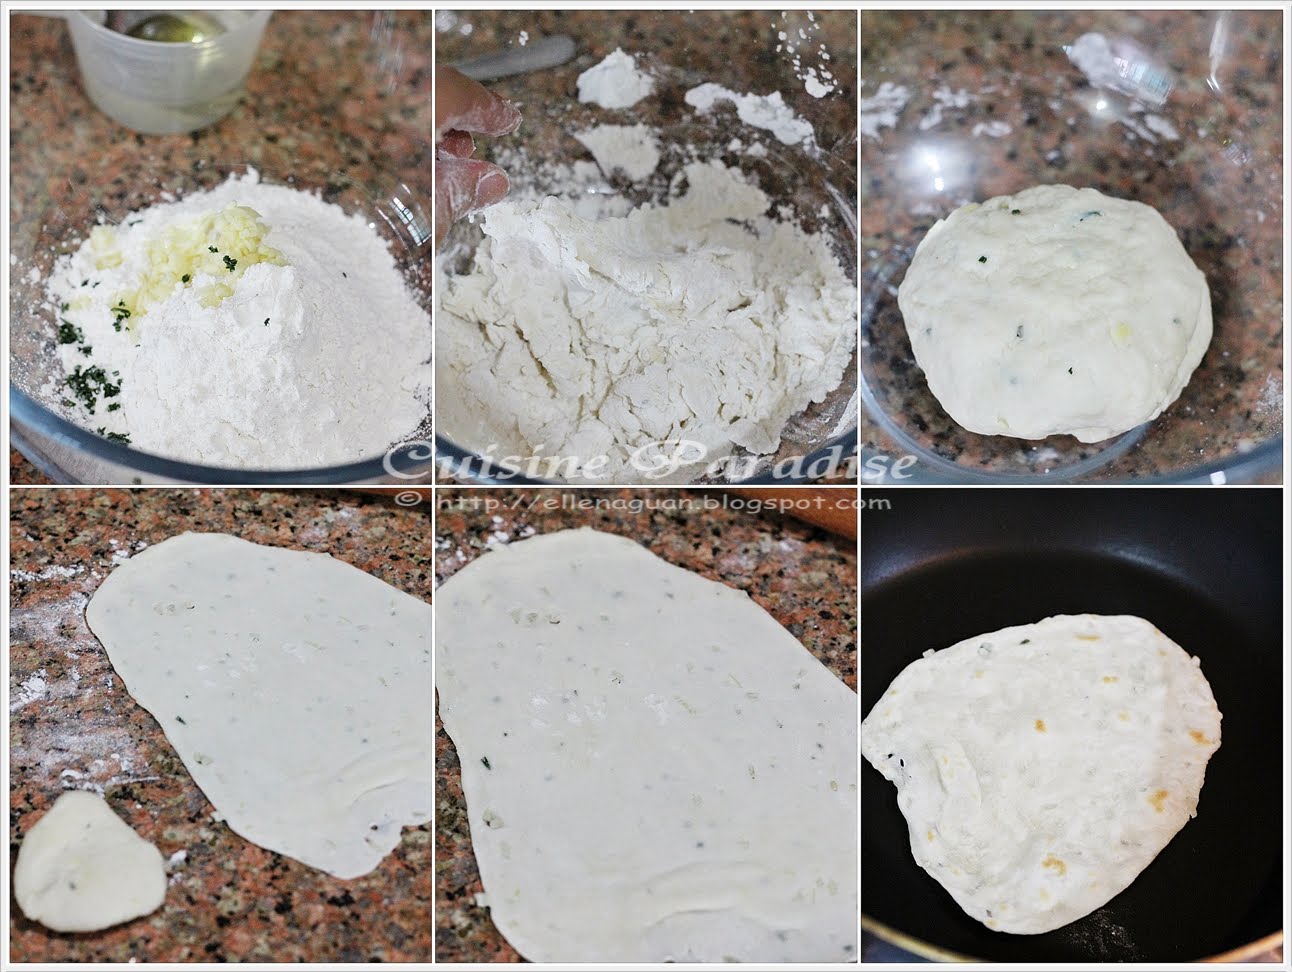
1. Melt the chocolate, coffee, rum or brandy, sugar and butter (and salt, if using) in a bowl sitting in a pot of barely simmering water. Remove from the heat and stir until well mixed.

2. Add the ground almonds and mix well. Beat in the egg yolks, one by one.

* Unless you can’t take nuts, you must include the almonds! The nutty flavour brings out another dimension against the smooth chocolate. Amazing.

3. Beat the egg whites until stiff and peaky, and stir a couple of spoonfuls into the chocolate mixture to lighten it, before gently folding in the rest. 

* Let me clarify for those who are unclear: add whites to chocolate, not the other way around.

4. Turn into a buttered and floured 20cm (8in) round or square cake tin and bake at 180°C/Gas 4 for 40 to 50 mins (less if you like it fudgey, more if you like it cakey).

* I found it neither fudgey nor cakey. I’d like to use the word “mousse-like” to describe the velvety-soft interior. If you like chocolate mousse, you’ll love this cake. 

5. Leave to cool before removing gently from the tin, and dust with icing sugar to serve.

This was what I got after baking for 40 mins, and to me, it was perfect – slightly crusty edges with an interior so tender, it yielded completely to the gentlest nudge of the fork. If, however, you like it “cakier”, then bake slightly longer but with a sheet of foil tenting the cake. It could brown too much and burn. Do keep an eye as you bake … chocolate cakes have a tendency to produce burnt tops if you are not watchful.

But basically, this is it! A cake that truly lives up to its glowing reputation. 🙂 Isn’t it a beauty? ‘Twas was a HUGE hit, with everyone asking for seconds and get this, the next day too!

Kiwifruit & Lime Cupcakes

 
As much as you read about my passion on using fresh fruits in both my dishes and bakes I am rather excited with my new love on using “kiwifruit” as one of the key ingredient. Before my recent encounter with ZESPRI kiwifruit, I didn’t know that kiwifruit has so much health benefits or rather it could be so versatile to use in creating our daily meals. 

Below is another way that you could in-cooperate kiwifruit in baking some delicious cupcakes to impressive your guests with minimum steps and effort. These serve great for afternoon tea with cup of fragrant tea to balance it’s zesty taste. 

KIWIFRUIT AND LIME CUPCAKES

We love the texture of this cupcake which is soft, moist and infuse with hint of sweet and sour zesty flavour from the green kiwifruit and lime syrup. And it really taste great while eating it warm as a tea-cake or as after meal dessert which gives you a refreshing taste and comfort feeling especially during cold nights. 

(makes6 | Preparation10 minutes | Cooking25 minutes)

Ingredients:
75g Self-raising Flour
40g Plain Flour
50g Ground Almond
80g Caster Sugar
62g Unsalted Butter, melted and cooled
1 Large Egg
60ml Milk
1 1/2 Ripe Green Kiwifruit, cut into cubes
1/2 Green Kiwifruit, sliced for garnishing

Method:-

1. Preheat oven to 180°C. Place combined flours, almond meal and sugar in a large mixing bowl. Stir well.

2. Whisk egg and milk together with melt butter and slowly stir into the flour ingredients follow by the cubed kiwifruit.

3. Using a spatula, mix well and spoon mixture into paper cases and bake in preheated oven for 25 – 30 minutes till golden and skewer inserted and comes out clean.

4. Cool in pan for 10 minutes before turning onto wire rack to cool further.

LIME SYRUP

Lime syrup is great to act as an addition toppings to enhance the flavour of  many dessert dishes or as an accompaniment to certain drinks which needs a zesty lift. This syrup can be served warmed or cold with desserts or cold. For a combination you could also used half portion of lime juice mixed with lemon juice instead of using one type of fruit.

(Preparation5 minutes | Cooking10 minutes)

Ingredients:
Zest of 1 Lime
90ml Lime Juice(about 2 – 3 limes)
80g Caster Sugar

Method:-

1. To make the lime syrup, place lime rind, lime juice and sugar in a small saucepan. Stir over low heat until sugar dissolves.

2. Simmer over medium low heat for 8 – 10 minutes until thickened.

3. Cool the syrup slightly. Use a skewer make holes over the cakes before spooning the sryup over cakes and top with sliced kiwifruit.

4. You could also un-mould cake on serving plates, spoon over extra lime syrup and serve warm.

Crisp Duck with Apple & Orange Sauce serve with Rosemary & Garlic Flatbread

I have hardly use DUCK meat as one of my ingredient while planning for our daily meals. I guess the only dish that I known how to cook by using whole/portion duck is to make “Braised Duck with Dark Soya Sauce” which is a well-like dish in most Asia families. Not long ago, I have read up a recipe and post fromJacob over at Cook.Snap.Eat.Love where he takes the effort and time to prepare Duck Confit as a main course to host a few food bloggers on a tasting session(read more HERE).

After going through Jacob’s recipe plus some others similar recipes online, I find making Duck Confit was rather complicated and time consuming for my standard as a home cook. So after much consideration, I think I better settle for something easier which I could managed and keep that big project aside for the time being.

CRISP DUCK WITH APPLE AND ORANGE SAUCE

This is a pretty easy dish with minimum preparation but comes with delicious combination of savory crisp duck, crunchy fresh apple plus salad greens swam in pool of aromatic spiced orange sauce. Personally I love the sweet and tangy taste of the orange sauce which really goes well with the whole combination and especially on the crisp duck.

Here I used half portion of the duck(which included the duck breast fillet and drumstick) instead of two duck fillets because I have left over from the previous dish on braised soya duck. If you are getting the duck from the wet market poultry stalls, you could also ask them to help you de-bone the fillet which would be easier for you.

(serves2 | Preparation30 minutes | Cooking25 minutes)

Ingredients:
2 Duck Fillets, skin on
1/2 Tablespoon Sea Salt
Dash of Freshly Ground Black Pepper
1 Red Delicious Apple, sliced thinly
2 Servings of Salad Greens

Method:-

1. Preheat oven to 200°C. Place a wire rack over a foil-lined baking tray.

2. Make shallow incisions diagonally across skin of duck apart 1cm apart, rub sea salt into skin.

3. Place a non-stick frying pan on medium heat, add duck, skin-side down and cook for 8 minutes until skin is crispy.

4. Transfer to wire rack, skin-side up and bake for 12 – 15 minutes until tender. Remove from oven and stand on wire rack for 10 minutes before slicing it.

5. Using a vegetable slicer or knife, sliced the apple thinly and place it on the duck slices on prepared plates.

6. Drizzle some orange sauce on the apple and duck mixture, top with some salad greens and homemade rosemary and garlic flatbread on the side and serve warm with extra orange sauce.

Orange Sauce:

2 Tablespoons Orange Marmalade
1 Tablespoon Brown Sugar
Zest of 1 Orange
125ml of Orange Juice
60ml Cup Water
2 Star Anise

Method:-

1. Place orange marmalade, sugar, orange zest, orange juice, star anise and water in a small saucepan over medium heat. Stir until sugar has dissolved.

2. Simmer for 8 – 10 minutes, until sauce reduced and sightly thickened. Strain and serve warm.

ROSEMARY AND GARLIC FLATBREAD

flatbread is a simple bread made with flour, water, salt and then thoroughly rolled into flattened dough. Many flatbreads are unleavened which is made without using yeast or sourdough culture similar to the recipe shown below. And in order to make the above crisp duck salad more filling, I decided to pair it with some homemade Rosemary and Garlic Flatbread which could be used to wrap up the crisp duck salad.

Recipe adapted and modify from Australia Masterchef website HERE.

(serves2 | Preparation30 minutes | Cooking10 minutes)

Ingredients:
125g Plain Flour
1/4 Teaspoon Salt
2 Garlic Cloves, finely chopped
1 Tablespoon Olive Oil
65ml(1/4 cup) Lukewarm Water
1 Tablespoon Finely Chopped Fresh Rosemary
Extra Flour, dusting
2 Tablespoons Melted Butter

Method:-

1. Combine olive oil and lukewarm water in a jug.

2. Process flour, salt and rosemary in a food processor or alternatively place them in a large mixing bowl.

3. Slowly add olive oil and water mixture to the flour to form a dough.

4. Turn dough onto floured surface and knead until smooth. Rest dough for at least 30 minutes

5. Divide dough into 6 dough balls, roll out flat and fry(without oil) for 2 minutes each side or until golden.

6. Brush with melted butter. Keep warm and serve together with the Crisp Duck salad above.

Other than making your own flatbread from scratch you could also purchase those ready-made “Wraps/Tortilla ” which are available in most leading supermarkets. I am sure you would like this dish as much as I do, and if duck fillets are not available in your area or liking you could always replace it with chicken fillets. And furthermore if you could get hold of kumquat marmalade I am it would add extra and unique flavour to this dish too. Enjoy! 

Avocado Chicken Parmigiana


Parmigiana (a short form of Parmigiana di melanzane) is a Southern Italian dish made with a shallow-fried sliced filling, layered with cheese, tomato sauce and baked before serving. But here we are making a quick version of this “Avocado Chicken Parmigiana” where tender chicken breast schnitzel is topped with bottled tomato pasta sauce and fresh avocado together with generous amount of grated Mozzarella cheese.


AVOCADO CHICKEN PARMIGIANA
(Quick and Easy version)

You could serve this Chicken Parmigiana with some garden salad on the side together with a bowl of hot soup and bread or use the chicken as a topper to make a pasta dish. And I am sure your guest would be impressed by this dish which is so easy to prepare and yet healthy in sight as well as taste.

(serves4 | Preparation10 minutes | Cooking15 minutes)

Ingredients:
2 Chicken Breast Fillets, halved lengthways
1/2 Cup Plain Flour
2 Tablespoons Fresh Milk
2 Eggs
1 1/2 Cups Dried Breadcrumbs
2 Tablespoons Olive Oil/Cooking Spray
1/2 Cup Tomato Pasta Sauce
Avocado, Sliced
1/2 Cup Grated Mozzarella Cheese
Salad Green, to serve

Method:-

1. Place chicken breast in a clear plastic bag(alternatively between 2 sheets plastic wrap), using a rolling pin or meat mallet pound until 0.5cm thick.

2. Place flour and breadcrumbs on two separate plate and lightly whisk milk and egg together in a shallow bowl.

3. Coat 1 piece of chicken breast in flour(shaking off excess), dip in egg mixture then coat in breadcrumbs using your fingertips pressing on to secure.

4. Place on prepared baking tray lay with foil or baking paper, repeat the same process with the remaining chicken breast with flour, egg and etc.

5. Lightly spray or brush the prepared chicken with oil, bake for 8 minutes(turning after 4 minutes to have evenly colours on the breadcrumbs) in preheated 200 degree Celsius(392°Fahrenheit) fan-forced oven.

6. Remove from oven and spread each chicken breast with 1 heaped tablespoon of pasta sauce. Arrange avocado slices over sauce and sprinkle with decent amount of mozzarella cheese.

7. Return to oven and bake for another 5 – 7 minutes or until golden and chicken is cooked through.

8. Serve with either garden salad or use it as a main topping on cooked pasta.

Personally I love this dish because it is so easy to prepare and yet full of flavour. The tender and juicy chicken breast is infuse with the mixture of sweet and savory taste from the tomato sauce, melted cheese and buttery flavour of the avocado which makes it a great combinations. Furthermore the garden salad at the side also adds in extra texture and flavour to balance the taste.

Hope this would be a great idea for your quick and easy weekend dish for your family or friends. For more ideas on using Avocado you can refer to my other recipes 

Pumpkin Granola Bar

My family loves granola and our my favourite granola supply come from “maameemoomoo” who always surprise us with her innovative flavoured granola like honey, pumpkin and chocolate. And since we have missed out Sherie’s pumpkin granola during Halloween orders, I decided to try making something similar to satisfy our craving. So with a twist and some research which I Google, I manage to bake some decent Pumpkin Granola Bar instead.

Although my granola bar might not taste as good as Sheri’s but at least I happy with the end result and also it’s a challenge for me to bake something with such a long ingredients list too.

PUMPKIN GRANOLA BAR

These golden granola bars are made with pumpkin puree, applesauce and honey which are so flavorful when mixed with the chewy rolled oats, cranberries, chocolate chips, spices and etc. Each bite is full of delicious autumn flavour which makes the whole process of time and effort worth. 

(Make16 x 26cm (base measurement) | Preparation30 minutes | Baking45 minutes)

Ingredients:
3 Cups (260g) Rolled Oats
1 Teaspoon Mixed Spices
1/2 Teaspoon Sea Salt
3/4 Cup Brown Sugar
1/2 Cup Pumpkin Puree
1/4 Cup Apple Sauce
1/4 Cup Honey
1 Teaspoon Vanilla Extract
1/4 Cup (60g) Dried Cranberries
1/4 Cup (40g) Pumpkin Seeds
1/4 Cup Chocolate Chips
1/2 Cup Roasted Almond
1 Tablespoon Chia Seeds

Method:-
1. Preheat the oven to 180° degree Celsius (350 degrees Fahrenheit) and crease a 3cm deep, 16cm x 26cm brownie pan and line it with baking paper, allowing 2cm overhang on all sides.

2. In a large bowl, whisk rolled oats, mixed spices and salt together.

3. In another bowl, whisk brown sugar, pumpkin puree, apple sauce, honey and vanilla extract until smooth.

4. Pour pumpkin mixture over rolled oats and stir well till oats are moist.

5. Stir in dried cranberries, pumpkin seeds, chocolate chips, roasted almond and chia seeds till combined.

6. Evenly press oat mixture into prepared pan and bake for 40 minutes or until golden brown as pumpkin puree adds moisture to the oats mixture and you don’t want them to be under bake. 

7. Remove, cool completely and using a sharp knife and cut it into 12 – 14 bars.

Ingredients For Pumpkin Puree:
400g Pumpkin, cut into 1″ Cubes
1 Tablespoon Water

Method:-
1. Place pumpkin cubes and 1 tablespoon of water in a microwave safe bowl.

2. Cook over high heat for about 15 minutes or until pumpkin is soften when mashed with a fork.

3. To get a nice and smooth consistency you can either mash or blend the cooked pumpkin with a fork or hand blender.

Ingredients For Apple Sauce
~ 2 Granny Smith Apples, cored and chopped
~ 1 Tablespoon Sugar ~ 1/4 Teaspoon Mixed Spice
~ 1 Tablespoon Lemon Juice
~ 1/4 Cup Water

Method:-
1. Combine all ingredients and cook over medium heat for 15 minutes or until apple soften and melt.

Although these granola bar might look crispy due to it’s colour but for your information they are actually more of the chewy type instead. But with the crunchy almond and nutty flavour from the chia seeds as well as chocolate chips and cranberries this pumpkin bar definitely taste awesome with all it’s goodness. 

Tropical Smoothies

Who doesn’t want an ice COLD smoothie for breakfast? Try this YUMMY combo and you’ll be HAPPY, I promise!


Tropical Smoothies
1 to 1 1/2 cups milk

1 (6-ounce) container pina colada or pineapple yogurt

1 ripe mango, cut into pieces (and peeled)
1 banana
3 to 5 strawberries

1/2 cup (or so) fresh pineapple

Couple handfuls ice

Blend all ingredients together in a blender until smooth. Enjoy with some yummy muffins for a tasty breakfast!

TIP: Feel free to add more or less of certain ingredients or switch out some of mine for something you prefer! I think some kiwi would be a great addition, along with a touch of coconut or coconut milk. Mmmm!

Strawberry Shortcake Trifle

Another great dessert to take to a FAMILY gathering! This is so easy, but always looksELEGANT and tastes fantastic. It’s like SUMMER in a bowl (or trifle dish)—am I right?

Strawberry Shortcake Trifle

1 box Strawberry Danish, prepared according to “Fruit Sauce” directions
4 cups sliced strawberries
1 loaf angel food cake, cut into 1-inch cubes
1 (8-ounce) container Cool Whip
Combine the Danish and prepared strawberries and refrigerate for 1 hour. 
In a large glass bowl or trifle dish, place half the cake cubes. Top with half the strawberry mixture and half the Cool Whip. Repeat layers. Refrigerate at least 1 hour before serving. Makes 8 to 10 servings.
TIP: Make sure to dig all the way down when serving so everyone gets strawberries, cream, and cake! 

Creamy Banana Brownie Cake

After having the twins, a super SWEET neighbor brought us this yummy dessert and we fell in LOVE with it. I hope there are still some FRESH strawberries at your grocer that you can make this with. If so, I would do it TONIGHT!

Creamy Banana Brownie Cake
1 box “chewy” brownie mix, prepared in a 8 x 8-inch pan and cooled completely
1 small box instant vanilla pudding, prepared
1 small container Cool Whip
1 or 2 bananas, sliced
Strawberries, sliced
1 Heath bar

After baking and cooling the brownie, prepare the pudding mix with milk according to directions and let set. Stir in desired amount of Cool Whip; set aside. (I probably used about half of the container, if not a little more. Just do it to your taste!) Place the banana slices over the cooled brownie to completely cover and then top with the pudding mixture. Lay strawberries over top and then shave the Heath bar over all. Let set in the refrigerator at least 4 hours before serving.

TIP: I like the brownie to be thick, so for a 9 x 13-inch pan I used 1 1/2 boxes of brownie mix even though it said it was for the larger size pan. I’m sure you could double it for some extra goodness! Also, the combinations are endless for this recipe. If you love banana, try using banana pudding for a really strong banana flavor (though when you serve it with the vanilla, everyone will think it’s banana pudding already). You could also do chocolate pudding and it would delish!

Raspberry Lemon Muffins

This is a recipe I found in a neighborhood cookbook. We LOVE muffins at our house and these are EXCELLENT! Spread some butter on one straight from the oven—itsHEAVENLY!

Raspberry Lemon Muffins
2 cups flour
1 cup sugar
1 tablespoon baking powder
1/2 teaspoon salt
2 eggs
1 cup cream or whole milk
1/2 cup vegetable oil
1 teaspoon lemon extract
1 1/2 to 2 cups fresh or frozen raspberries

Combine all ingredients in a bowl except raspberries. Gently fold in the raspberries. Spoon into muffin tin and bake at 400 degrees for 18 to 20 minutes, or until golden brown.

TIP: This would be delicious with other types of berries—strawberries, blueberries, you name it! You could also try using different flavored fruity extracts to mix things up as well.